#laravel axios post example
Explore tagged Tumblr posts
Visit Tumblr Blog
Explore Tumblr blogs with no restrictions, modern design and the best experience.
Last Seen Tumblr Blogs


Fun Fact
In 2020, Tumblr had 29.4 million users in the US.
Text
Laravel 5.8 Tutorial From Scratch - e26 - Vue Basics 101 - Laravel
Laravel 5.8 Tutorial From Scratch – e26 – Vue Basics 101 – Laravel
Laravel 5.8 Tutorial From Scratch – e26 – Vue Basics 101 – Laravel
[ad_1]
Vue is a modern Javascript framework that is powerful but yet simple to understand. In this episode, we are covering the basics of Vue by setting up a reusable button component. We will wrap it up by fetching some data from the Laravel backend using Axios.
For the best experience, follow along in our interactive school at h…
View On WordPress
#fetching data in laravel#full stack vue#laravel#laravel 5.8#Laravel API#laravel axios post example#laravel fetching data from database#laravel front end#laravel frontend tutorial#laravel mix#laravel mix 5.8#laravel mix vue#laravel node modules#laravel npm install#laravel vue#laravel vue js crud#laravel vue setup#laravel vue tutorial#laravel vue.js#laravel webpack tutorial#npm run dev#npm run watch laravel#vue#Vue.js#vuejs laravel
0 notes
Link
Nuxt.js provides an Axios module for easy integration with your application. Axios is a promise-based HTTP client that works in the browser and Node.js environment or, in simpler terms, it is a tool for making requests (e.g API calls) in client-side applications and Node.js environment. In this tutorial, we’re going to learn how to use the Axios module and how to make a request on the server-side using asyncData and fetch. These two methods make a request on the server-side but they have some differences which we’re also going to cover. Finally, we’ll learn how to perform authentication and secure pages/routes using the auth module and auth middleware. This article requires basic knowledge of Nuxtjs and Vuejs as we’ll be building on top of that. For those without experience with Vuejs, I recommend you start from their official documentation and the Nuxt official page before continuing with this article.
What Is The Nuxt.js Axios Module?
According to the official Documentation,
“It is a Secure and easy Axios integration with Nuxt.js.”
Here are some of its features:
Automatically set base URL for client-side & server-side.
Proxy request headers in SSR (Useful for auth).
Fetch Style requests.
Integrated with Nuxt.js Progressbar while making requests.
To use the axios module in your application, you will have to first install it by using either npm or yarn. YARN
yarn add @nuxtjs/axios
NPM
npm install @nuxtjs/axios
Add it into your nuxt.config.js file:
modules: [ '@nuxtjs/axios', ], axios: { // extra config e.g // BaseURL: 'https://link-to-API' }
The modules array accepts a list of Nuxt.js modules such as dotenv, auth and in this case, Axios. What we’ve done is to inform our application that we would be using the Axios module, which we reference using @nuxtjs/axios. This is then followed by the axios property which is an object of configurations like the baseURL for both client-side and server-side. Now, you can access Axios from anywhere in your application by calling this.$axios.method or this.$axios.$method. Where method can be get, post, or delete.
Making Your First Request Using Axios
For this tutorial, I’ve put together a simple application on Github. The repository contains two folders, start and finish, the start folder contains all you need to get right into the tutorial. The finish folder contains a completed version of what we would be building. After cloning the repo and opening the start folder, we would need to install all our packages in the package.json file so open your terminal and run the following command:
npm install
Once that is done, we can start our app using the npm run dev command. This is what you should see when you go to localhost:3000.
Our application’s landing page. (Large preview)
The next thing we have to do is to create a .env file in the root folder of our application and add our API URL to it. For this tutorial, we’ll be using a sample API built to collect reports from users.
API_URL=https://ireporter-endpoint.herokuapp.com/api/v2/
This way, we do not have to hard code our API into our app which is useful for working with two APIs (development and production). The next step would be to open our nuxt.config.js file and add the environmental variable to our axios config that we added above.
/* ** Axios module configuration */ axios: { // See https://github.com/nuxt-community/axios-module#options baseURL: process.env.API_URL, },
Here, we tell Nuxt.js to use this baseURL for both our client-side and server-side requests whenever we use this Axios module. Now, to fetch a list of reports, let us open the index.vue file and add the following method to the script section.
async getIncidents() { let res = await this.$store.dispatch("getIncidents"); this.incidents = res.data.data.incidents; }
What we have done is to create an async function that we call getIncidents() and we can tell what it does from the name — it fetches a list of incidents using the Vuex store action method this.$store.dispatch. We assign the response from this action to our incidents property so we can be able to make use of it in the component. We want to call the getIncidents() method whenever the component mounts. We can do that using the mounted hook.
mounted() { this.getIncidents() }
mounted() is a lifecycle hook that gets called when the component mounts. That will cause the call to the API to happen when the component mounts. Now, let us go into our index.js file in our store and create this action where we’ll be making our Axios request from.
export const actions = { async getIncidents() { let res = await this.$axios.get('/incidents') return res; } }
Here, we created the action called getIncidents which is an async function, then we await a response from the server and return this response. The response from this action is sent back to our getIncidents() method in our index.vue file. If we refresh our application, we should now be able to see a long list of incidents rendered on the page.
List of incidents on landing page. (Large preview)
We have made our first request using Axios but we won’t stop there, we are going to be trying out asyncData and fetch to see the differences between them and using Axios.
AsyncData
AsyncData fetches data on the server-side and it’s called before loading the page component. It does not have access to this because it is called before your page component data is created. this is only available after the created hook has been called so Nuxt.js automatically merges the returned data into the component’s data. Using asyncData is good for SEO because it fetches your site’s content on the server-side and also helps in loading content faster. Note that asyncData method can only be used in the pages folder of your application as it would not work in the components folder. This is because asyncData hook gets called before your component is created.
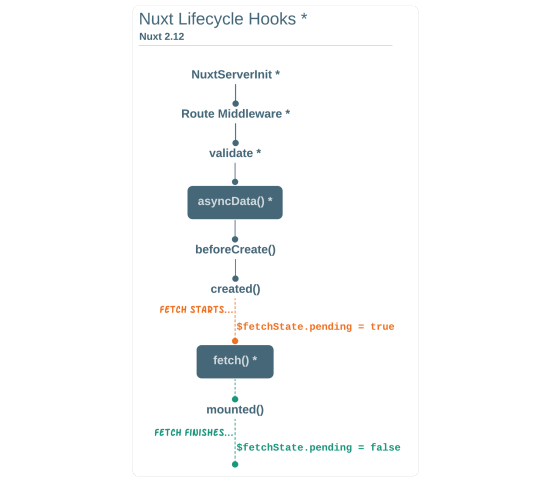
Image from Nuxt blog. (Large preview)
Let us add asyncData to our index.vue file and observe how fast our incidents data loads. Add the following code after our components property and let us get rid of our mounted hook.
async asyncData({ $axios }) { let { data } = await $axios.get("/incidents"); return { incidents: data.data.incidents }; }, // mounted() { // this.getIncidents(); // },
Here, the asyncData method accepts a property from the context $axios. We use this property to fetch the list of incidents and the value is then returned. This value is automatically injected into our component. Now, you can notice how fast your content loads if you refresh the page and at no time is there no incident to render.
Fetch
The Fetch method is also used to make requests on the server-side. It is called after the created hook in the life cycle which means it has access to the component’s data. Unlike the asyncData method, the fetch method can be used in all .vue files and be used with the Vuex store. This means that if you have the following in your data function.
data() { return { incidents: [], id: 5, gender: 'male' }; }
You can easily modify id or gender by calling this.id or this.gender.
Using Axios As A Plugin
During the process of development with Axios, you might find that you need extra configuration like creating instances and interceptors for your request so your application can work as intended and thankfully, we can do that by extending our Axios into a plugin. To extend axios, you have to create a plugin (e.g. axios.js) in your plugins folder.
export default function ({ $axios, store, redirect }) { $axios.onError(error => { if (error.response && error.response.status === 500) { redirect('/login') } }) $axios.interceptors.response.use( response => { if (response.status === 200) { if (response.request.responseURL && response.request.responseURL.includes('login')) { store.dispatch("setUser", response); } } return response } ) }
This is an example of a plugin I wrote for a Nuxt application. Here, your function takes in a context object of $axios, store and redirect which we would use in configuring the plugin. The first thing we do is to listen for an error with a status of 500 using $axios.onError and redirect the user to the login page. We also have an interceptor that intercepts every request response we make in our application checks if the status of the response we get is 200. If that is true we proceed and check that there is a response.request.responseURL and if it includes login. If this checks out to be true, we then send this response using our store’s dispatch method where it then mutated in our state. Add this plugin to your nuxt.config.js file:
plugins: [ '~/plugins/axios' ]
After doing this, your Axios plugin would intercept any request you make and check if you have defined a special case for it.
Introduction To The Auth Module
The auth module is used for performing authentication for your Nuxt application and can be accessed from anywhere in your application using $this.auth. It is also available in fetch, asyncData, middleware and NuxtInitServer from the context object as $auth. The context provides additional objects/params from Nuxt to Vue components and is available in special nuxt lifecycle areas like those mentioned above. To use the auth module in your application, you would have to install it using yarn or npm. YARN
yarn add @nuxtjs/auth
NPM
npm install @nuxtjs/auth
Add it to your nuxt.config.js file.
modules: [ '@nuxtjs/auth' ], auth: { // Options }
The auth property accepts a list of properties such as strategies and redirect. Here, strategies accepts your preferred authentication method which can be:
local For username/email and password-based flow.
facebook For using Facebook accounts as a means of authentication.
Github For authenticating users with Github accounts.
Google For authenticating users with Google accounts.
Auth0
Laravel Passport
The redirect property accepts an object of links for:
login Users would be redirected to this link if login is required.
logout Users would be redirected here if after logout current route is protected.
home Users would be redirected here after login.
Now, let us add the following to our nuxt.config.js file.
/* ** Auth module configuration */ auth: { redirect: { login: '/login', logout: '/', home: '/my-reports' }, strategies: { local: { endpoints: { login: { url: "/user/login", method: "post", propertyName: "data.token", }, logout: false, user: false, }, tokenType: '', tokenName: 'x-auth', autoFetchUser: false }, }, }
Please note that the auth method works best when there is a user endpoint provided in the option above. Inside the auth config object, we have a redirect option in which we set our login route to /login, logout route to / and home route to /my-reports which would all behave as expected. We also have a tokenType property which represents the Authorization type in the header of our Axios request. It is set to Bearer by default and can be changed to work with your API. For our API, there is no token type and this is why we’re going to leave it as an empty string. The tokenName represents the Authorization name (or the header property you want to attach your token to) inside your header in your Axios request. By default, it is set to Authorization but for our API, the Authorization name is x-auth. The autoFetchUser property is used to enable user fetch object using the user endpoint property after login. It is true by default but our API does not have a user endpoint so we have set that to false. For this tutorial, we would be using the local strategy. In our strategies, we have the local option with endpoints for login, user and logout but in our case, we would only use the *login* option because our demo API does not have a *logout* endpoint and our user object is being returned when *login* is successful. Note: The auth module does not have a register endpoint option so that means we’re going to register the traditional way and redirect the user to the login page where we will perform the authentication using this.$auth.loginWith. This is the method used in authenticating your users. It accepts a ‘strategy’ (e.g local) as a first argument and then an object to perform this authentication with. Take a look at the following example.
let data { email: '[email protected]', password: '123456' } this.$auth.loginWith('local', { data })
Using The Auth Module
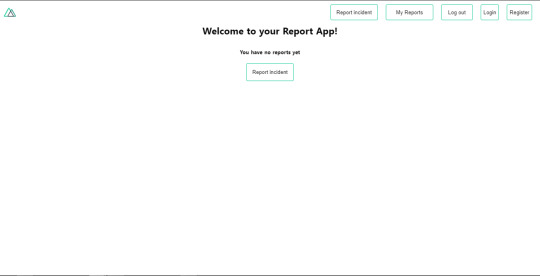
Now that we have configured our auth module, we can proceed to our registration page. If you visit the /register page, you should see a registration form.
Register page. (Large preview)
Let us make this form functional by adding the following code:
methods: { async registerUser() { this.loading = true; let data = this.register; try { await this.$axios.post("/user/create", data); this.$router.push("/login"); this.loading = false; this.$notify({ group: "success", title: "Success!", text: "Account created successfully" }); } catch (error) { this.loading = false; this.$notify({ group: "error", title: "Error!", text: error.response ? error.response.data.error : "Sorry an error occured, check your internet" }); } } }
Here, we have an async function called registerUser which is tied to a click event in our template and makes an Axios request wrapped in a try/catch block to an endpoint /user/create. This redirects to the /login page and notifies the user of a successful registration. We also have a catch block that alerts the user of any error if the request is not successful. If the registration is successful, you would be redirected to the login page.
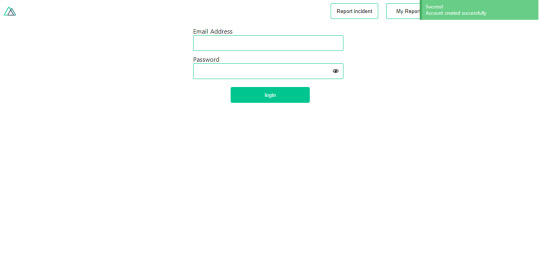
Login page with notification component. (Large preview)
Here, we’re going to make use of auth authentication method this.$auth.loginWith('local', loginData) after which we would use the this.$auth.setUser(userObj) to set the user in our auth instance. To get the login page working, let’s add the following code to our login.vue file.
methods: { async logIn() { let data = this.login; this.loading = true; try { let res = await this.$auth.loginWith("local", { data }); this.loading = false; let user = res.data.data.user; this.$auth.setUser(user); this.$notify({ group: "success", title: "Success!", text: "Welcome!" }); } catch (error) { this.loading = false; this.$notify({ group: "error", title: "Error!", text: error.response ? error.response.data.error : "Sorry an error occured, check your internet" }); } } }
We created an async function called logIn using the auth method this.$auth.loginWith('local, loginData). If this login attempt is successful, we then assign the user data to our auth instance using this.$auth.setUser(userInfo) and redirect the user to the /my-report page. You can now get user data using this.$auth.user or with Vuex using this.$store.state.auth.user but that’s not all. The auth instance contains some other properties which you can see if you log in or check your state using your Vue dev tools. If you log this.$store.state.auth to the console, you’ll see this:
{ "auth": { "user": { "id": "d7a5efdf-0c29-48aa-9255-be818301d602", "email": "[email protected]", "lastName": "Xo", "firstName": "Tm", "othernames": null, "isAdmin": false, "phoneNumber": null, "username": null }, "loggedIn": true, "strategy": "local", "busy": false } }
The auth instance contains a loggedIn property that is useful in switching between authenticated links in the nav/header section of your application. It also contains a strategy method that states the type of strategy the instance is running (e.g local). Now, we will make use of this loggedIn property to arrange our nav links. Update your navBar component to the following:
<template> <header class="header"> <div class="logo"> <nuxt-link to="/"> <Logo /> </nuxt-link> </div> <nav class="nav"> <div class="nav__user" v-if="auth.loggedIn"> <p></p> <button class="nav__link nav__link--long"> <nuxt-link to="/report-incident">Report incident</nuxt-link> </button> <button class="nav__link nav__link--long"> <nuxt-link to="/my-reports">My Reports</nuxt-link> </button> <button class="nav__link" @click.prevent="logOut">Log out</button> </div> <button class="nav__link" v-if="!auth.loggedIn"> <nuxt-link to="/login">Login</nuxt-link> </button> <button class="nav__link" v-if="!auth.loggedIn"> <nuxt-link to="/register">Register</nuxt-link> </button> </nav> </header> </template> <script> import { mapState } from "vuex"; import Logo from "@/components/Logo"; export default { name: "nav-bar", data() { return {}; }, computed: { ...mapState(["auth"]) }, methods: { logOut() { this.$store.dispatch("logOut"); this.$router.push("/login"); } }, components: { Logo } }; </script> <style></style>
In our template section, we have several links to different parts of the application in which we are now using auth.loggedIn to display the appropriate links depending on the authentication status. We have a logout button that has a click event with a logOut() function attached to it. We also display the user’s email gotten from the auth property which is accessed from our Vuex store using the mapState method which maps our state auth to the computed property of the nav component. We also have a logout method that calls our Vuex action logOut and redirects the user to the login page. Now, let us go ahead and update our store to have a logOut action.
export const actions = { // .... logOut() { this.$auth.logout(); } }
The logOut action calls the auth logout method which clears user data, deletes tokens from localStorage and sets loggedIn to false. Routes like /my-reports and report-incident should not be visible to guests but at this point in our app, that is not the case. Nuxt does not have a navigation guard that can protect your routes, but it has is the auth middleware. It gives you the freedom to create your own middleware so you can configure it to work the way you want. It can be set in two ways:
Per route.
Globally for the whole app in your nuxt.config.js file.
router: { middleware: ['auth'] }
This auth middleware works with your auth instance so you do not need to create an auth.js file in your middleware folder. Let us now add this middleware to our my-reports.vue and report-incident.vue files. Add the following lines of code to the script section of each file.
middleware: 'auth'
Now, our application would check if the user trying to access these routes has an auth.loggedIn value of true. It’ll redirect them to the login page using our redirect option in our auth config file — if you’re not logged in and you try to visit either /my-report or report-incident, you would be redirected to /login. If you go to /report-incidents, this is what you should see.
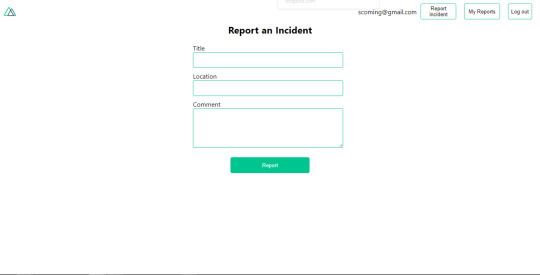
Report incident page. (Large preview)
This page is for adding incidents but that right now the form does not send incident to our server because we are not making the call to the server when the user attempts to submit the form. To solve this, we will add a reportIncident method which will be called when the user clicks on Report. We’ll have this in the script section of the component. This method will send the form data to the server. Update your report-incident.vue file with the following:
<template> <section class="report"> <h1 class="report__heading">Report an Incident</h1> <form class="report__form"> <div class="input__container"> <label for="title" class="input__label">Title</label> <input type="text" name="title" id="title" v-model="incident.title" class="input__field" required /> </div> <div class="input__container"> <label for="location" class="input__label">Location</label> <input type="text" name="location" id="location" v-model="incident.location" required class="input__field" /> </div> <div class="input__container"> <label for="comment" class="input__label">Comment</label> <textarea name="comment" id="comment" v-model="incident.comment" class="input__area" cols="30" rows="10" required ></textarea> </div> <input type="submit" value="Report" class="input__button" @click.prevent="reportIncident" /> <p class="loading__indicator" v-if="loading">Please wait....</p> </form> </section> </template> <script> export default { name: "report-incident", middleware: "auth", data() { return { loading: false, incident: { type: "red-flag", title: "", location: "", comment: "" } }; }, methods: { async reportIncident() { let data = this.incident; let formData = new FormData(); formData.append("title", data.title); formData.append("type", data.type); formData.append("location", data.location); formData.append("comment", data.comment); this.loading = true; try { let res = await this.$store.dispatch("reportIncident", formData); this.$notify({ group: "success", title: "Success", text: "Incident reported successfully!" }); this.loading = false; this.$router.push("/my-reports"); } catch (error) { this.loading = false; this.$notify({ group: "error", title: "Error!", text: error.response ? error.response.data.error : "Sorry an error occured, check your internet" }); } } } }; </script> <style> </style>
Here, we have a form with input fields for title, location, and comment with two-way data binding using v-model. We also have a submit button with a click event. In the script section, we have a reportIncident method that collects all the information provided in the form and is sent to our server using FormData because the API is designed to also accept images and videos. This formData is attached to a Vuex action using the dispatch method, if the request is successful, you get redirected to /my-reports with a notification informing you that this request was successful otherwise, you would be notified of an error with the error message. At this point, we don’t have reportIncident action in our store yet so in your browser console, you would see an error if you try to click submit on this page.

Vuex error message. (Large preview)
To fix this, add the reportIncident action your index.js file.
export const actions = { // ... async reportIncident({}, data) { let res = await this.$axios.post('/incident/create', data) return res; } }
Here, we have a reportIncident function that takes in an empty context object and the data we’re sending from our form. This data is then attached to a post request that creates an incident and returns back to our report-incident.vue file. At this point, you should be able to add a report using the form after which you would be redirected to /my-reports page.
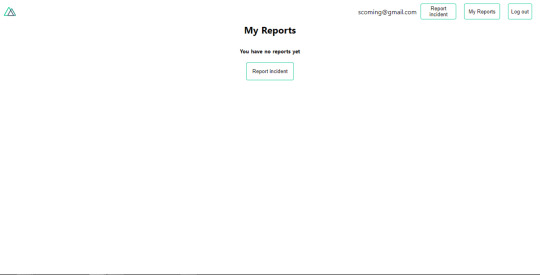
My reports page empty. (Large preview)
This page should display a list of incidents created by the user but right now it only shows what we see above, let’s go ahead to fix that. We’re going to be using the fetch method we learned about to get this list. Update your my-reports.vue file with the following:
<script> import incidentCard from "@/components/incidentCard.vue"; export default { middleware: "auth", name: "my-reports", data() { return { incidents: [] }; }, components: { incidentCard }, async fetch() { let { data } = await this.$axios.get("/user/incidents"); this.incidents = data.data; } }; </script>
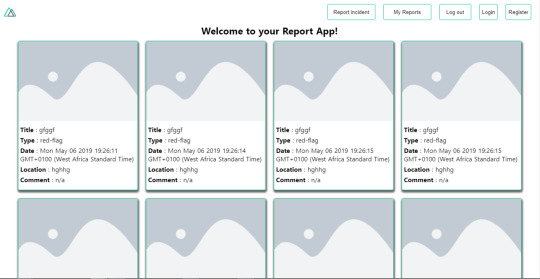
Here, we use fetch method to get user-specific incidents and assign the response to our incidents array. If you refresh your page after adding an incident, you should see something like this.
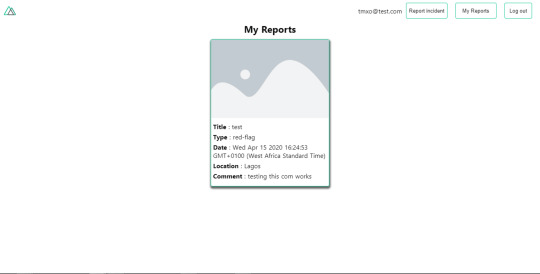
My Reports page with a report. (Large preview)
At this point, we would notice a difference in how fetch method and asyncData loads our data.
Conclusion
So far, we have learned about the Axios module and all of its features. We have also learned more about asyncData, and how we can fetch both of them together despite their differences. We’ve also learned how to perform authentication in our application using the auth module and how to use the auth middleware to protect our routes. Here are some useful resources that talk more about all we’ve covered.
Getting started with meta tags in Nuxjs.
Using the dotenv module in Nuxt.
Using Fetch in your Nuxt app.
Getting started with asyncData.
0 notes
Text
Alpine.js: The JavaScript Framework That’s Used Like jQuery, Written Like Vue, and Inspired by TailwindCSS
We have big JavaScript frameworks that tons of people already use and like, including React, Vue, Angular, and Svelte. Do we need another JavaScript library? Let’s take a look at Alpine.js and you can decide for yourself. Alpine.js is for developers who aren’t looking to build a single page application (SPA). It’s lightweight (~7kB gzipped) and designed to write markup-driven client-side JavaScript.
The syntax is borrowed from Vue and Angular directive. That means it will feel familiar if you’ve worked with those before. But, again, Alpine.js is not designed to build SPAs, but rather enhance your templates with a little bit of JavaScript.
For example, here’s an Alpine.js demo of an interactive “alert” component.
CodePen Embed Fallback
The alert message is two-way bound to the input using x-model="msg". The “level” of the alert message is set using a reactive level property. The alert displays when when both msg and level have a value.
It’s like a replacement for jQuery and JavaScript, but with declarative rendering
Alpine.js is a Vue template-flavored replacement for jQuery and vanilla JavaScript rather than a React/Vue/Svelte/WhateverFramework competitor.
Since Alpine.js is less than a year old, it can make assumptions about DOM APIs that jQuery cannot. Let’s briefly draw a comparison between the two.
Querying vs. binding
The bulk of jQuery’s size and features comes in the shape of a cross-browser compatibility layer over imperative DOM APIs — this is usually referred to as jQuery Core and sports features that can query the DOM and manipulate it.
The Alpine.js answer to jQuery core is a declarative way to bind data to the DOM using the x-bind attribute binding directive. It can be used to bind any attribute to reactive data on the Alpine.js component. Alpine.js, like its declarative view library contemporaries (React, Vue), provides x-ref as an escape hatch to directly access DOM elements from JavaScript component code when binding is not sufficient (eg. when integrating a third-party library that needs to be passed a DOM Node).
Handling events
jQuery also provides a way to handle, create and trigger events. Alpine.js provides the x-on directive and the $event magic value which allows JavaScript functions to handle events. To trigger (custom) events, Alpine.js provides the $dispatch magic property which is a thin wrapper over the browser’s Event and Dispatch Event APIs.
Effects
One of jQuery’s key features is its effects, or rather, it’s ability to write easy animations. Where we might use slideUp, slideDown, fadeIn, fadeOut properties in jQuery to create effects, Alpine.js provides a set of x-transition directives, which add and remove classes throughout the element’s transition. That’s largely inspired by the Vue Transition API.
Also, jQuery’s Ajax client has no prescriptive solution in Alpine.js, thanks to the Fetch API or taking advantage of a third party HTTP library (e.g. axios, ky, superagent).
Plugins
It’s also worth calling out jQuery plugins. There is no comparison to that (yet) in the Alpine.js ecosystem. Sharing Alpine.js components is relatively simple, usually requiring a simple case of copy and paste. The JavaScript in Alpine.js components are “just functions” and tend not to access Alpine.js itself, making them relatively straightforward to share by including them on different pages with a script tag. Any magic properties are added when Alpine initializes or is passed into bindings, like $event in x-on bindings.
There are currently no examples of Alpine.js extensions, although there are a few issues and pull requests to add “core” events that hook into Alpine.js from other libraries. There are also discussions happening about the ability to add custom directives. The stance from Alpine.js creator Caleb Porzio, seems to be basing API decisions on the Vue APIs, so I would expect that any future extension point would be inspired on what Vue.js provides.
Size
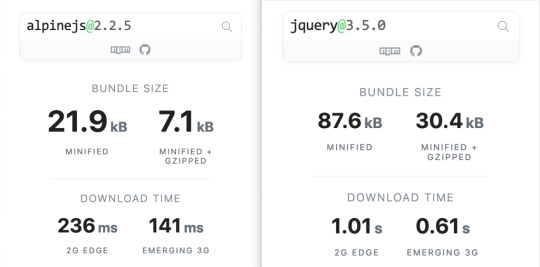
Alpine.js is lighter weight than jQuery, coming in at 21.9kB minified — 7.1kB gzipped — compared to jQuery at 87.6kB minified — 30.4kB minified and gzipped. Only 23% the size!
Most of that is likely due to the way Alpine.js focuses on providing a declarative API for the DOM (e.g. attribute binding, event listeners and transitions).

Bundlephobia breaks down the two
For the sake of comparison, Vue comes in at 63.5kB minified (22.8kB gzipped). How can Alpine.js come in lighter despite it’s API being equivalent Vue? Alpine.js does not implement a Virtual DOM. Instead, it directly mutates the DOM while exposing the same declarative API as Vue.
Let’s look at an example
Alpine is compact because since application code is declarative in nature, and is declared via templates. For example, here’s a Pokemon search page using Alpine.js:
CodePen Embed Fallback
This example shows how a component is set up using x-data and a function that returns the initial component data, methods, and x-init to run that function on load.
Bindings and event listeners in Alpine.js with a syntax that’s strikingly similar to Vue templates.
Alpine: x-bind:attribute="express" and x-on:eventName="expression", shorthand is :attribute="expression" and @eventName="expression" respectively
Vue: v-bind:attribute="express" and v-on:eventName="expression", shorthand is :attribute="expression" and @eventName="expression" respectively
Rendering lists is achieved with x-for on a template element and conditional rendering with x-if on a template element.
Notice that Alpine.js doesn’t provide a full templating language, so there’s no interpolation syntax (e.g. in Vue.js, Handlebars and AngularJS). Instead, binding dynamic content is done with the x-text and x-html directives (which map directly to underlying calls to Node.innerText and Node.innerHTML).
An equivalent example using jQuery is an exercise you’re welcome to take on, but the classic style includes several steps:
Imperatively bind to the button click using $('button').click(/* callback */).
Within this “click callback” get the input value from the DOM, then use it to call the API.
Once the call has completed, the DOM is updated with new nodes generated from the API response.
If you’re interested in a side by side comparison of the same code in jQuery and Alpine.js, Alex Justesen created the same character counter in jQuery and in Alpine.js.
Back in vogue: HTML-centric tools
Alpine.js takes inspiration from TailwindCSS. The Alpine.js introduction on the repository is as “Tailwind for JavaScript.”
Why is that important?
One of Tailwind’s selling points is that it “provides low-level utility classes that let you build completely custom designs without ever leaving your HTML.” That’s exactly what Alpine does. It works inside HTML so there is no need to work inside of JavaScript templates the way we would in Vue or React Many of the Alpine examples cited in the community don’t even use script tags at all!
Let’s look at one more example to drive the difference home. Here’s is an accessible navigation menu in Alpine.js that uses no script tags whatsoever.
CodePen Embed Fallback
This example leverages aria-labelledby and aria-controls outside of Alpine.js (with id references). Alpine.js makes sure the “toggle” element (which is a button), has an aria-expanded attribute that’s true when the navigation is expanded, and false when it’s collapsed. This aria-expanded binding is also applied to the menu itself and we show/hide the list of links in it by binding to hidden.
Being markup-centric means that Alpine.js and TailwindCSS examples are easy to share. All it takes is a copy-paste into HTML that is also running Alpine.js/TailwindCSS. No crazy directories full of templates that compile and render into HTML!
Since HTML is a fundamental building block of the web, it means that Alpine.js is ideal for augmenting server-rendered (Laravel, Rails, Django) or static sites (Hugo, Hexo, Jekyll). Integrating data with this sort of tooling can be a simple as outputting some JSON into the x-data="{}" binding. The affordance of passing some JSON from your backend/static site template straight into the Alpine.js component avoids building “yet another API endpoint” that simply serves a snippet of data required by a JavaScript widget.
Client-side without the build step
Alpine.js is designed to be used as a direct script include from a public CDN. Its developer experience is tailored for that. That’s why it makes for a great jQuery comparison and replacement: it’s dropped in and eliminates a build step.
While it’s not traditionally used this way, the bundled version of Vue can be linked up directly. Sarah Drasner has an excellent write-up showing examples of jQuery substituted with Vue. However, if you use Vue without a build step, you’re actively opting out of:
the Vue CLI
single file components
smaller/more optimized bundles
a strict CSP (Content Security Policy) since Vue inline templates evaluate expressions client-side
So, yes, while Vue boasts a buildless implementation, its developer experience is really depedent on the Vue CLI. That could be said about Create React App for React, and the Angular CLI. Going build-less strips those frameworks of their best qualities.
There you have it! Alpine.js is a modern, CDN-first library that brings declarative rendering for a small payload — all without the build step and templates that other frameworks require. The result is an HTML-centric approach that not only resembles a modern-day jQuery but is a great substitute for it as well.
If you’re looking for a jQuery replacement that’s not going to force you into a SPAs architecture, then give Alpine.js a go! Interested? You can find out more on Alpine.js Weekly, a free weekly roundup of Alpine.js news and articles.
The post Alpine.js: The JavaScript Framework That’s Used Like jQuery, Written Like Vue, and Inspired by TailwindCSS appeared first on CSS-Tricks.
via CSS-Tricks https://ift.tt/3aMMDvq
0 notes
Text
Alpine.js: The JavaScript Framework That’s Used Like jQuery, Written Like Vue, and Inspired by TailwindCSS
We have big JavaScript frameworks that tons of people already use and like, including React, Vue, Angular, and Svelte. Do we need another JavaScript library? Let’s take a look at Alpine.js and you can decide for yourself. Alpine.js is for developers who aren’t looking to build a single page application (SPA). It’s lightweight (~7kB gzipped) and designed to write markup-driven client-side JavaScript.
The syntax is borrowed from Vue and Angular directive. That means it will feel familiar if you’ve worked with those before. But, again, Alpine.js is not designed to build SPAs, but rather enhance your templates with a little bit of JavaScript.
For example, here’s an Alpine.js demo of an interactive “alert” component.
CodePen Embed Fallback
The alert message is two-way bound to the input using x-model="msg". The “level” of the alert message is set using a reactive level property. The alert displays when when both msg and level have a value.
It’s like a replacement for jQuery and JavaScript, but with declarative rendering
Alpine.js is a Vue template-flavored replacement for jQuery and vanilla JavaScript rather than a React/Vue/Svelte/WhateverFramework competitor.
Since Alpine.js is less than a year old, it can make assumptions about DOM APIs that jQuery cannot. Let’s briefly draw a comparison between the two.
Querying vs. binding
The bulk of jQuery’s size and features comes in the shape of a cross-browser compatibility layer over imperative DOM APIs — this is usually referred to as jQuery Core and sports features that can query the DOM and manipulate it.
The Alpine.js answer to jQuery core is a declarative way to bind data to the DOM using the x-bind attribute binding directive. It can be used to bind any attribute to reactive data on the Alpine.js component. Alpine.js, like its declarative view library contemporaries (React, Vue), provides x-ref as an escape hatch to directly access DOM elements from JavaScript component code when binding is not sufficient (eg. when integrating a third-party library that needs to be passed a DOM Node).
Handling events
jQuery also provides a way to handle, create and trigger events. Alpine.js provides the x-on directive and the $event magic value which allows JavaScript functions to handle events. To trigger (custom) events, Alpine.js provides the $dispatch magic property which is a thin wrapper over the browser’s Event and Dispatch Event APIs.
Effects
One of jQuery’s key features is its effects, or rather, it’s ability to write easy animations. Where we might use slideUp, slideDown, fadeIn, fadeOut properties in jQuery to create effects, Alpine.js provides a set of x-transition directives, which add and remove classes throughout the element’s transition. That’s largely inspired by the Vue Transition API.
Also, jQuery’s Ajax client has no prescriptive solution in Alpine.js, thanks to the Fetch API or taking advantage of a third party HTTP library (e.g. axios, ky, superagent).
Plugins
It’s also worth calling out jQuery plugins. There is no comparison to that (yet) in the Alpine.js ecosystem. Sharing Alpine.js components is relatively simple, usually requiring a simple case of copy and paste. The JavaScript in Alpine.js components are “just functions” and tend not to access Alpine.js itself, making them relatively straightforward to share by including them on different pages with a script tag. Any magic properties are added when Alpine initializes or is passed into bindings, like $event in x-on bindings.
There are currently no examples of Alpine.js extensions, although there are a few issues and pull requests to add “core” events that hook into Alpine.js from other libraries. There are also discussions happening about the ability to add custom directives. The stance from Alpine.js creator Caleb Porzio, seems to be basing API decisions on the Vue APIs, so I would expect that any future extension point would be inspired on what Vue.js provides.
Size
Alpine.js is lighter weight than jQuery, coming in at 21.9kB minified — 7.1kB gzipped — compared to jQuery at 87.6kB minified — 30.4kB minified and gzipped. Only 23% the size!
Most of that is likely due to the way Alpine.js focuses on providing a declarative API for the DOM (e.g. attribute binding, event listeners and transitions).
Bundlephobia breaks down the two
For the sake of comparison, Vue comes in at 63.5kB minified (22.8kB gzipped). How can Alpine.js come in lighter despite it’s API being equivalent Vue? Alpine.js does not implement a Virtual DOM. Instead, it directly mutates the DOM while exposing the same declarative API as Vue.
Let’s look at an example
Alpine is compact because since application code is declarative in nature, and is declared via templates. For example, here’s a Pokemon search page using Alpine.js:
CodePen Embed Fallback
This example shows how a component is set up using x-data and a function that returns the initial component data, methods, and x-init to run that function on load.
Bindings and event listeners in Alpine.js with a syntax that’s strikingly similar to Vue templates.
Alpine: x-bind:attribute="express" and x-on:eventName="expression", shorthand is :attribute="expression" and @eventName="expression" respectively
Vue: v-bind:attribute="express" and v-on:eventName="expression", shorthand is :attribute="expression" and @eventName="expression" respectively
Rendering lists is achieved with x-for on a template element and conditional rendering with x-if on a template element.
Notice that Alpine.js doesn’t provide a full templating language, so there’s no interpolation syntax (e.g. in Vue.js, Handlebars and AngularJS). Instead, binding dynamic content is done with the x-text and x-html directives (which map directly to underlying calls to Node.innerText and Node.innerHTML).
An equivalent example using jQuery is an exercise you’re welcome to take on, but the classic style includes several steps:
Imperatively bind to the button click using $('button').click(/* callback */).
Within this “click callback” get the input value from the DOM, then use it to call the API.
Once the call has completed, the DOM is updated with new nodes generated from the API response.
If you’re interested in a side by side comparison of the same code in jQuery and Alpine.js, Alex Justesen created the same character counter in jQuery and in Alpine.js.
Back in vogue: HTML-centric tools
Alpine.js takes inspiration from TailwindCSS. The Alpine.js introduction on the repository is as “Tailwind for JavaScript.”
Why is that important?
One of Tailwind’s selling points is that it “provides low-level utility classes that let you build completely custom designs without ever leaving your HTML.” That’s exactly what Alpine does. It works inside HTML so there is no need to work inside of JavaScript templates the way we would in Vue or React Many of the Alpine examples cited in the community don’t even use script tags at all!
Let’s look at one more example to drive the difference home. Here’s is an accessible navigation menu in Alpine.js that uses no script tags whatsoever.
CodePen Embed Fallback
This example leverages aria-labelledby and aria-controls outside of Alpine.js (with id references). Alpine.js makes sure the “toggle” element (which is a button), has an aria-expanded attribute that’s true when the navigation is expanded, and false when it’s collapsed. This aria-expanded binding is also applied to the menu itself and we show/hide the list of links in it by binding to hidden.
Being markup-centric means that Alpine.js and TailwindCSS examples are easy to share. All it takes is a copy-paste into HTML that is also running Alpine.js/TailwindCSS. No crazy directories full of templates that compile and render into HTML!
Since HTML is a fundamental building block of the web, it means that Alpine.js is ideal for augmenting server-rendered (Laravel, Rails, Django) or static sites (Hugo, Hexo, Jekyll). Integrating data with this sort of tooling can be a simple as outputting some JSON into the x-data="{}" binding. The affordance of passing some JSON from your backend/static site template straight into the Alpine.js component avoids building “yet another API endpoint” that simply serves a snippet of data required by a JavaScript widget.
Client-side without the build step
Alpine.js is designed to be used as a direct script include from a public CDN. Its developer experience is tailored for that. That’s why it makes for a great jQuery comparison and replacement: it’s dropped in and eliminates a build step.
While it’s not traditionally used this way, the bundled version of Vue can be linked up directly. Sarah Drasner has an excellent write-up showing examples of jQuery substituted with Vue. However, if you use Vue without a build step, you’re actively opting out of:
the Vue CLI
single file components
smaller/more optimized bundles
a strict CSP (Content Security Policy) since Vue inline templates evaluate expressions client-side
So, yes, while Vue boasts a buildless implementation, its developer experience is really depedent on the Vue CLI. That could be said about Create React App for React, and the Angular CLI. Going build-less strips those frameworks of their best qualities.
There you have it! Alpine.js is a modern, CDN-first library that brings declarative rendering for a small payload — all without the build step and templates that other frameworks require. The result is an HTML-centric approach that not only resembles a modern-day jQuery but is a great substitute for it as well.
If you’re looking for a jQuery replacement that’s not going to force you into a SPAs architecture, then give Alpine.js a go! Interested? You can find out more on Alpine.js Weekly, a free weekly roundup of Alpine.js news and articles.
The post Alpine.js: The JavaScript Framework That’s Used Like jQuery, Written Like Vue, and Inspired by TailwindCSS appeared first on CSS-Tricks.
Alpine.js: The JavaScript Framework That’s Used Like jQuery, Written Like Vue, and Inspired by TailwindCSS published first on https://deskbysnafu.tumblr.com/
0 notes
Text
Alpine.js: The JavaScript Framework That’s Used Like jQuery, Written Like Vue, and Inspired by TailwindCSS
We have big JavaScript frameworks that tons of people already use and like, including React, Vue, Angular, and Svelte. Do we need another JavaScript library? Let’s take a look at Alpine.js and you can decide for yourself. Alpine.js is for developers who aren’t looking to build a single page application (SPA). It’s lightweight (~7kB gzipped) and designed to write markup-driven client-side JavaScript.
The syntax is borrowed from Vue and Angular directive. That means it will feel familiar if you’ve worked with those before. But, again, Alpine.js is not designed to build SPAs, but rather enhance your templates with a little bit of JavaScript.
For example, here’s an Alpine.js demo of an interactive “alert” component.
CodePen Embed Fallback
The alert message is two-way bound to the input using x-model="msg". The “level” of the alert message is set using a reactive level property. The alert displays when when both msg and level have a value.
It’s like a replacement for jQuery and JavaScript, but with declarative rendering
Alpine.js is a Vue template-flavored replacement for jQuery and vanilla JavaScript rather than a React/Vue/Svelte/WhateverFramework competitor.
Since Alpine.js is less than a year old, it can make assumptions about DOM APIs that jQuery cannot. Let’s briefly draw a comparison between the two.
Querying vs. binding
The bulk of jQuery’s size and features comes in the shape of a cross-browser compatibility layer over imperative DOM APIs — this is usually referred to as jQuery Core and sports features that can query the DOM and manipulate it.
The Alpine.js answer to jQuery core is a declarative way to bind data to the DOM using the x-bind attribute binding directive. It can be used to bind any attribute to reactive data on the Alpine.js component. Alpine.js, like its declarative view library contemporaries (React, Vue), provides x-ref as an escape hatch to directly access DOM elements from JavaScript component code when binding is not sufficient (eg. when integrating a third-party library that needs to be passed a DOM Node).
Handling events
jQuery also provides a way to handle, create and trigger events. Alpine.js provides the x-on directive and the $event magic value which allows JavaScript functions to handle events. To trigger (custom) events, Alpine.js provides the $dispatch magic property which is a thin wrapper over the browser’s Event and Dispatch Event APIs.
Effects
One of jQuery’s key features is its effects, or rather, it’s ability to write easy animations. Where we might use slideUp, slideDown, fadeIn, fadeOut properties in jQuery to create effects, Alpine.js provides a set of x-transition directives, which add and remove classes throughout the element’s transition. That’s largely inspired by the Vue Transition API.
Also, jQuery’s Ajax client has no prescriptive solution in Alpine.js, thanks to the Fetch API or taking advantage of a third party HTTP library (e.g. axios, ky, superagent).
Plugins
It’s also worth calling out jQuery plugins. There is no comparison to that (yet) in the Alpine.js ecosystem. Sharing Alpine.js components is relatively simple, usually requiring a simple case of copy and paste. The JavaScript in Alpine.js components are “just functions” and tend not to access Alpine.js itself, making them relatively straightforward to share by including them on different pages with a script tag. Any magic properties are added when Alpine initializes or is passed into bindings, like $event in x-on bindings.
There are currently no examples of Alpine.js extensions, although there are a few issues and pull requests to add “core” events that hook into Alpine.js from other libraries. There are also discussions happening about the ability to add custom directives. The stance from Alpine.js creator Caleb Porzio, seems to be basing API decisions on the Vue APIs, so I would expect that any future extension point would be inspired on what Vue.js provides.
Size
Alpine.js is lighter weight than jQuery, coming in at 21.9kB minified — 7.1kB gzipped — compared to jQuery at 87.6kB minified — 30.4kB minified and gzipped. Only 23% the size!
Most of that is likely due to the way Alpine.js focuses on providing a declarative API for the DOM (e.g. attribute binding, event listeners and transitions).

Bundlephobia breaks down the two
For the sake of comparison, Vue comes in at 63.5kB minified (22.8kB gzipped). How can Alpine.js come in lighter despite it’s API being equivalent Vue? Alpine.js does not implement a Virtual DOM. Instead, it directly mutates the DOM while exposing the same declarative API as Vue.
Let’s look at an example
Alpine is compact because since application code is declarative in nature, and is declared via templates. For example, here’s a Pokemon search page using Alpine.js:
CodePen Embed Fallback
This example shows how a component is set up using x-data and a function that returns the initial component data, methods, and x-init to run that function on load.
Bindings and event listeners in Alpine.js with a syntax that’s strikingly similar to Vue templates.
Alpine: x-bind:attribute="express" and x-on:eventName="expression", shorthand is :attribute="expression" and @eventName="expression" respectively
Vue: v-bind:attribute="express" and v-on:eventName="expression", shorthand is :attribute="expression" and @eventName="expression" respectively
Rendering lists is achieved with x-for on a template element and conditional rendering with x-if on a template element.
Notice that Alpine.js doesn’t provide a full templating language, so there’s no interpolation syntax (e.g. in Vue.js, Handlebars and AngularJS). Instead, binding dynamic content is done with the x-text and x-html directives (which map directly to underlying calls to Node.innerText and Node.innerHTML).
An equivalent example using jQuery is an exercise you’re welcome to take on, but the classic style includes several steps:
Imperatively bind to the button click using $('button').click(/* callback */).
Within this “click callback” get the input value from the DOM, then use it to call the API.
Once the call has completed, the DOM is updated with new nodes generated from the API response.
If you’re interested in a side by side comparison of the same code in jQuery and Alpine.js, Alex Justesen created the same character counter in jQuery and in Alpine.js.
Back in vogue: HTML-centric tools
Alpine.js takes inspiration from TailwindCSS. The Alpine.js introduction on the repository is as “Tailwind for JavaScript.”
Why is that important?
One of Tailwind’s selling points is that it “provides low-level utility classes that let you build completely custom designs without ever leaving your HTML.” That’s exactly what Alpine does. It works inside HTML so there is no need to work inside of JavaScript templates the way we would in Vue or React Many of the Alpine examples cited in the community don’t even use script tags at all!
Let’s look at one more example to drive the difference home. Here’s is an accessible navigation menu in Alpine.js that uses no script tags whatsoever.
CodePen Embed Fallback
This example leverages aria-labelledby and aria-controls outside of Alpine.js (with id references). Alpine.js makes sure the “toggle” element (which is a button), has an aria-expanded attribute that’s true when the navigation is expanded, and false when it’s collapsed. This aria-expanded binding is also applied to the menu itself and we show/hide the list of links in it by binding to hidden.
Being markup-centric means that Alpine.js and TailwindCSS examples are easy to share. All it takes is a copy-paste into HTML that is also running Alpine.js/TailwindCSS. No crazy directories full of templates that compile and render into HTML!
Since HTML is a fundamental building block of the web, it means that Alpine.js is ideal for augmenting server-rendered (Laravel, Rails, Django) or static sites (Hugo, Hexo, Jekyll). Integrating data with this sort of tooling can be a simple as outputting some JSON into the x-data="{}" binding. The affordance of passing some JSON from your backend/static site template straight into the Alpine.js component avoids building “yet another API endpoint” that simply serves a snippet of data required by a JavaScript widget.
Client-side without the build step
Alpine.js is designed to be used as a direct script include from a public CDN. Its developer experience is tailored for that. That’s why it makes for a great jQuery comparison and replacement: it’s dropped in and eliminates a build step.
While it’s not traditionally used this way, the bundled version of Vue can be linked up directly. Sarah Drasner has an excellent write-up showing examples of jQuery substituted with Vue. However, if you use Vue without a build step, you’re actively opting out of:
the Vue CLI
single file components
smaller/more optimized bundles
a strict CSP (Content Security Policy) since Vue inline templates evaluate expressions client-side
So, yes, while Vue boasts a buildless implementation, its developer experience is really depedent on the Vue CLI. That could be said about Create React App for React, and the Angular CLI. Going build-less strips those frameworks of their best qualities.
There you have it! Alpine.js is a modern, CDN-first library that brings declarative rendering for a small payload — all without the build step and templates that other frameworks require. The result is an HTML-centric approach that not only resembles a modern-day jQuery but is a great substitute for it as well.
If you’re looking for a jQuery replacement that’s not going to force you into a SPAs architecture, then give Alpine.js a go! Interested? You can find out more on Alpine.js Weekly, a free weekly roundup of Alpine.js news and articles.
The post Alpine.js: The JavaScript Framework That’s Used Like jQuery, Written Like Vue, and Inspired by TailwindCSS appeared first on CSS-Tricks.
source https://css-tricks.com/alpine-js-the-javascript-framework-thats-used-like-jquery-written-like-vue-and-inspired-by-tailwindcss/
from WordPress https://ift.tt/2We2Ap8 via IFTTT
0 notes
Link
laravel axios get request,laravel axios get example,laravel axios post example,laravel vue axios post,simple laravel vue axios,vue get data from database
0 notes
Photo

New Post has been published on https://programmingbiters.com/file-uploads-with-laravel-5-and-dropzone-drag-and-drop/
File Uploads with Laravel 5 and Dropzone drag and drop
File uploads with Laravel is incredibly easy, thanks to the powerful file systemabstraction that it comes bundled with. Couple that up with Dropzone’s drag and drop feature, and you have a robust file upload mechanism. Not only these are easy to implement, they provide a great number of features in very few lines of code.
# Setting up the uploads
We’ll create a database table that contains information about each of the uploads. Of course we are not going to store our file in the database itself, rather we’d store only some metadata of the file. So let’s create a schema.
1
2
3
4
5
6
7
8
9
10
11
12
13
14
15
public function up()
Schema::create(‘uploads’, function (Blueprint $table)
$table->increments(‘id’);
$table->integer(‘user_id’)->unsigned()->index();
$table->string(‘filename’);
$table->bigInteger(‘size’);
$table->softDeletes();
$table->timestamps();
$table->foreign(‘user_id’)->references(‘id’)->on(‘users’)->onDelete(‘cascade’);
);
Here only metadata we are storing are filename and size . filename would be used to store and retrieve the file later. We add a foreign keyuser_id to keep track of who uploaded the file. This can also be used to check the owner of a file. We are also going to use SoftDeletes to mark a file as deleted rather than actually delete the file from storage, when a user deletes a file.
Now, let’s php artisan make:model Upload to create a Upload model for this table.
Next, we define the relationship between a user and an uploaded file – a user may upload many files and each uploaded file will belong to a user. Therefore, let’s define a one-to-many relationship in our User and Upload models. In theUser model:
1
2
3
4
5
6
public function uploads()
return $this->hasMany(Upload::class);
and the inverse relationship is defined in our Upload model:
1
2
3
4
5
6
public function user()
return $this->belongsTo(User::class);
Also while we are at it, let’s update the fillable columns for our Upload model.
1
2
3
4
5
6
7
8
9
10
11
12
13
14
15
16
17
18
19
use Illuminate\Database\Eloquent\SoftDeletes;
use App\User;
class Upload extends Model
use SoftDeletes;
protected $fillable = [
‘filename’, ‘size’,
];
public function user()
return $this->belongsTo(User::class);
That’s all! Our Upload model is now ready.
# Setting up dropzone
Now that our uploads backend is ready, let’s setup dropzone for drag and drop file uploads.
First we need to install dropzone, so let’s do a npm install dropzone —save . Next, we need to load the dropzone library. Since we are going to use Laravel Mix to compile our frontend assets, we can load the library withinresources/assets/js/bootstrap.js :
1
2
3
4
5
6
// Dropzone
window.Dropzone = require(‘dropzone’);
Dropzone.autoDiscover = false;
This will set Dropzone to the window object. We are disabling the autoDiscover option, which is used to automatically attach dropzone with any file input, which we do not need.
Now let’s add the styling for this (otherwise it’s going to look uglier than Voldemort’s face, trust me). We can do this in ourresources/assets/sass/app.scss .
1
2
3
4
5
6
7
8
@import “~dropzone/src/dropzone.scss”;
.dropzone
margin-bottom: 20px;
min-height: auto;
All set. So we can now compile the assets using npm run dev .
# Setting up routes
Before we start uploading any files, we need to define some routes. Here we’d create two routes, one for receiving the uploads and one for deleting the uploads, should a user choose to delete one.
1
2
3
4
5
Route::post(‘/upload’, ‘UploadController@store’)->name(‘upload.store’);
Route::delete(‘/upload/upload’, ‘UploadController@destroy’);
Let’s php artisan make:controller UploadController to create the controller. We will use this UploadController to process the uploads in the backend.
# Uploading files
Now that we have pulled in dropzone and attached it to the window object, we need to integrate dropzone within a view to start file uploads. We can simple do this using an id tag.
1
2
3
<div id=“file” class=“dropzone”></div>
class=“dropzone” is used to style the dopzone upload box. We can use the#file to inject dropzone on this element. (tip: it is a best practice in laravel to create javascript snippets in separate partials and then including them in whichever blade template they are needed)
1
2
3
4
5
6
7
8
9
let drop = new Dropzone(‘#file’,
addRemoveLinks: true,
url: ‘ route(‘upload.store‘) ’,
headers:
‘X-CSRF-TOKEN’: document.head.querySelector(‘meta[name=”csrf-token”]’).content
);
We are instantiating the Dropzone class on our #file and then passing in some addition configuration. addRemoveLinks will add a remove link to every uploaded file, so a user can remove a file after uploading it. The url option is used to let dropzone know where to post the uploaded file to, in case we are not using a form. If we are using a form, by default dropzone would use the action attribute of the form as the post url (I’m not quite sure about this though, so please don’t take my words as is, and do correct me if I am wrong). We are using the upload.store route which we have defined earlier.
headers are used to send additional headers to the server. Because we are posting our uploads, we need to send a X–CSRF–TOKEN header, otherwise our app will throw a TokenMismatchException (this is used by laravel to protect our app against CSRF attacks). By default, the meta information in head contains a meta with the name csrf–token . Therefore we select the meta and extract the content which gives us the token .
Dropzone provide’s a huge number of configuration options. Check out the documentation for all the available options. (Also don’t forget to thank the developer of dropzone )
Now that we are able to post files from the frontend, let’s work on our controller to receive and process the uploads on backend.
In the UploadController , let’s define a method storeUploadedFile() which receives a Illuminate\Http\UploadedFile and store all the metadata in our database.
1
2
3
4
5
6
7
8
9
10
11
12
13
14
15
16
17
protected function storeUploadedFile(UploadedFile $uploadedFile)
$upload = new Upload;
$upload->fill([
‘filename’ => $uploadedFile->getClientOriginalName(),
‘size’ => $uploadedFile->getSize(),
]);
$upload->user()->associate(auth()->user());
$upload->save();
return $upload;
getClientOriginalName() gives us the original name of the file that has been uploaded. getSize() returns the size of the uploaded file in bytes. We thenassociate() the upload with the currently logged in user. Finally we save the file and return the model instance.
In the store() method, we accept a Request and then from that request, we extract the file.
1
2
3
4
5
6
public function store(Request $request)
$uploadedFile = $request->file(‘file’);
We are going to store this file in our local filesystem. Of course you can upload it to Amazon S3 or any other cloud storage services and laravel provides an excellent documentation on how to configure different storage services. However, I’m going to store the uploads on our local disk only.
Next we need to save the file metadata like name, size and the user who uploaded it to our database. For this, we can use thestoreUploadedFile() method we implemented above.
1
2
3
$upload = $this->storeUploadedFile($uploadedFile);
This returns us an instance of the Upload model. We can now use this to store the file.
1
2
3
4
5
6
7
Storage::disk(‘local’)->putFileAs(
‘uploads/’ . $request->user()->id,
$uploadedFile,
$upload->filename
);
The Storage facade is used to interact with the disk in which we are going to store the file. Storage::disk(‘local’) gives us an instance of the local disk. The default local storage root is storage/app .
putFileAs() method is used to automatically stream a given file to a storage location. The first argument ‘uploads/’ . $request->user()->id is the upload path. We are creating a new directory uploads and within that directory creating another directory using user’s id and storing the file there, so that all files uploaded by a user goes to the same location. For example, if a user’s id is 7, any file he uploads will be stored at storage/app/uploads/7/ .
The second argument in putAsFile() method is theIlluminate\Http\UploadedFile instance and the last argument is the filename that will be used to store the file. Because at this point, we already have stored the file’s metadata in our database, we can simply get the name of the file by $upload->filename .
At this point, file storing is complete. Finally we send back a JSON response with the uploaded file’s id.
1
2
3
4
5
return response()->json([
‘id’ => $upload->id
]);
That’s all. The file has been stored on our local disk.
# Deleting files
To remove a file, Dropzone provides a removedfile event, which we can listen to and then send a delete request. We will use axios to send the request.
We can register to any dropzone event by calling .on(eventName,callbackFunction) on our dropzone instance. Check this documentation for a list of different dropzone events and when they are triggered.
Now we need to use the id of the uploaded file in order to send the delete request. But from the frontend how could we possibly know what’s the id of a uploaded file? Well, this is where the JSON response from thestore() method is useful. When we uploaded a file successfully, we are sending back the id of the file from the backend. On a successful upload, we can therefore associate this id with the file on the frontend.
1
2
3
4
5
drop.on(‘success’, function(file, response)
file.id = response.id;
);
When a file has been uploaded successfully, dropzone triggers a success event. We can register to this event to get the file instance and theresponse from the backend inside the callback function. We simple assign theresponse.id to file.id . Therefore, for every file that we have successfully uploaded, now we have an identifier associated with it to be used on the frontend. Great!
Now that we have an id associated with each file, deleting files is easy. We listen for removedfile event and then use axios from the global window object to fire a delete request to the backend.
1
2
3
4
5
6
7
8
9
10
11
drop.on(‘removedfile’, function(file)
axios.delete(‘/upload/’ + file.id).catch(function(error)
drop.emit(‘addedfile’,
id: file.id,
name: file.name,
size: file.size,
);
);
);
Notice how we are chaining the catch() method. This to catch any error when removing a file. If an error occurs that prevented the file deletion, we want to add it back so that the user knows the deletion failed and they may try again. We do that simply by calling the emit() method and passing in the details of the file. This will call the default addedfile event handler and add the file back.
Okay. So our frontend is ready to delete files. Let’s start working on thedestroy() controller method.
Because we are injecting the file id on our delete request, we can therefore accept the file we trying to delete , destroy(Upload $upload) , using laravel’s route model binding. The next thing we need to do is verify if the delete request is actually coming from the owner of the file. Let’s create a policy,UploadPolicy for that.
1
2
3
4
5
6
7
8
9
10
11
12
13
14
use App\User, Upload;
use Illuminate\Auth\Access\HandlesAuthorization;
class UploadPolicy
use HandlesAuthorization;
public function touch(User $user, Upload $upload)
return $user->id === $upload->user_id;
In the touch() method, we are checking if the ids of the user who uploaded it and the user who is sending the delete request is same. In our destroy() method, we can now use this touch() method to authorize the request.
1
2
3
$this->authorize(‘touch’, $upload);
Finally we can delete the file.
1
2
3
4
5
6
7
8
public function destroy(Upload $upload)
$this->authorize(‘touch’, $upload);
$upload->delete();
Since we are using SoftDeletes , this will mark the file as deleted in the database.
That’s all folks.
The complete UploadController looks like this.
1
2
3
4
5
6
7
8
9
10
11
12
13
14
15
16
17
18
19
20
21
22
23
24
25
26
27
28
29
30
31
32
33
34
35
36
37
38
39
40
41
42
43
44
45
46
47
48
49
50
51
52
53
54
55
56
57
58
59
<?php
namespace App\Http\Controllers;
use Storage;
use Illuminate\Http\Request;
use Illuminate\Http\UploadedFile;
use App\Upload;
class UploadController extends Controller
public function __construct()
$this->middleware(‘auth’);
public function store(Request $request)
$uploadedFile = $request->file(‘file’);
$upload = $this->storeUploadedFile($uploadedFile);
Storage::disk(‘local’)->putFileAs(
‘uploads/’ . $request->user()->id,
$uploadedFile,
$upload->filename
);
return response()->json([
‘id’ => $upload->id
]);
public function destroy(Upload $upload)
$this->authorize(‘touch’, $upload);
$upload->delete();
protected function storeUploadedFile(UploadedFile $uploadedFile)
$upload = new Upload;
$upload->fill([
‘filename’ => $uploadedFile->getClientOriginalName(),
‘size’ => $uploadedFile->getSize(),
]);
$upload->user()->associate(auth()->user());
$upload->save();
return $upload;
# Conclusion
There can be so many different ways of implementing file uploads. Dropzone’s documentation includes an example section that have quite a few in-depth excellent examples. Don’t forget to check that out!
0 notes
Link
The best part of any idea is when it's fresh and new, and you don't yet know the limitations and restrictions. It can be almost magical! Oh, the customers you'll help and the money you'll make! All you have to do first is... write a lot of code.
How much code? Well, obviously that depends on your idea and what business you're planning on setting up. But there's a huge amount of code you'll need and want for any SaaS business, and a lot of it you'll have to write before you can write even line one of your business logic.
Where did I come by this list? Well, I've spent quite a few years working on SaaS businesses at a variety of stages of maturity, and I keep my ear to the ground by listening to good SaaS podcasts. I noticed that there are a lot of common tasks necessary to launch a new SaaS product, and I decided to help fix that problem by taking it all and packing it into a SaaS starter kit to help cut down on the code you need to write (and the time you need to spend) to launch your business.
Let's explore that huge list of code.
Stuff You're Gonna Need
The basics
Okay, first you're gonna need something to start from. Unless you plan on writing everything from scratch, you'll need to set up some common frameworks to enable a modern web app to run. On the front-end, that's something like:
A bundler/build system. Examples: Webpack, Parcel, Gulp, Grunt.
Babel, if you want to use modern JavaScript features on older browsers.
A UI library. Examples: React, Vue, Angular, Elm.
A CSS framework. Examples: Bootstrap, TailwindCSS, Semantic, Bulma.
An HTTP requests library, if your framework doesn't come with one. Examples: Superagent, Axios, got.
A testing library. Examples: Jest, Mocha, Jasmine, Ava.
Getting all these various tools set up to work together will take some time as well. Just searching "configuring webpack for X" reveals a minefield of blog posts written for various versions of webpack and X. Some will help, some won't, and sometimes only experimentation will reveal which is which.
Thankfully, there are tools that make a lot of this easier. Next.js for React and Nuxt.js for Vue are just two examples, but there are many flavours of UI frameworks that can significantly reduce the setup time for the above. Of course, now you have to learn how your UI framework works as well as your UI library, but generally that trade-off is worthwhile.
Moving on to the back-end, you're going to want a web framework. This will largely depend on the language you're working with, but you have plenty to choose from:
Node.js: Fastify, Koa, and Express.
PHP: Laravel, Symfony, and CakePHP.
Python: Django, Pylons, and Zope.
Go: Gin, Beego, Martini.
Ruby: Sinatra, Hanami, and of course Rails.
This list is by no means extensive - just tracking down all the available frameworks for a single language would be an article in it's own. But it does display the variety of choices available. Each language and framework has its own capabilities and trade-offs, and that's something you'll have to take into account before you make your choice. (Or after! It's just harder to change your mind at that point.)
Development build system
Actually, let's take a step back for a second. Sure, those are the basics, but you still need someplace to run all that code, and in a way that speeds up your evaluation of code changes.
You could run everything on your local machine, but that's rarely ideal. For starters, your local environment is highly unlikely to resemble your production environment, and you don't want seemingly-minor differences causing problems when you deploy. Plus, it's very hard (comparatively) to automate local environment setup, so adding anyone else to the project is bound to cause conflict, especially if they want to use an entirely different OS from you.
You have a lot of options for this, but the two easiest/most-common are:
1) Use a Virtual Machine
Virtual Machines have the advantage of being very simple to understand and work with. If you know how to navigate your own system, you'll know how to navigate a virtual one just fine. They're easily automated with something like Ansible, and easy to use for development with something like Vagrant. Plus, you'll likely only need to modify a bit of your Ansible scripts or variables to turn your development deploy script into a production deploy script.
But they can be a bit heavy, as they are emulating an entire other machine. There are good solutions to this (enabling CPU optimizations, using AMIs or other machine images to reduce deploy time, etc), but there's also an alternative.
2) Use docker
Docker containers are crazy lightweight. Essentially, they just run the bits of the system required to run your code, as dictated by you. Plus, a great many CI systems accept dockerfiles as input to automatically run tests and deploys of your code. A well-built docker setup is a thing of beauty.
However, docker can be a bit confusing. It requires learning a different mindset and tooling from working directly on a machine or virtual machine, and can lead you naturally towards more-complex solutions where a simpler one would otherwise work better for your use case. (Hello, microservices!)
Reducing your development cycle time with watchers
A small thing that can save you a lot of time is setting watchers on your code. These are programs that keep an eye out for changes in your code, then re-compile and restart servers so that the latest version of your code is always running when you refresh your browser. Many of the tools you'll use will come with built-in watchers (webpack, for example), but for others, you'll need to install your own (nodemon to watch your Node.js server).
And like with anything else, there's configuration you have to do to make sure that each watcher is only watching the correct directories, that files are shared between your host system and VM/docker container in a fast method that won't trip up your watchers, etc.
Application template & UI architecture
With any luck, you'll have a design already to work with, but you still need to translate that design into an application template and common UI components and architecture. A good CSS framework can really help here, allowing you to set up common colours and sizes that you can use across the entire project, and using component-based development can allow you to, say, create a TextInput element once, then use it across your project multiple times. You'll also need to set up some form of menu infrastructure that allows you to enable/disable or hide/show certain menus based on user access or page location.
Logging
Proper logging can give you more and more-useful information than a slapdash setup can. You'll want to log requests and request data, useful checkpoint information, and the usual stuff - errors, stack traces, etc. But you also want to make sure not to log too much. For example, you'll obviously want to omit passwords, but you should also in general omit headers, especially headers containing authentication tokens, for obvious security reasons.
Database migrations
Database schemas are part of your app as well, and that means they need to be represented as code somewhere and checked into version control. Manually updating your production database to match your development database is amateur-hour.
So in addition to your back-end frameworks and your front-end frameworks, you'll need a database migration framework, and you'll need to write migrations for it.
Users
Users are the fundamental primitive of a SaaS application, and there's a common set of interactions you'll require: sign-up, login, logout, edit profile, etc. But sitting underneath all that is a bit of a contentious topic: user authentication.
There are a bunch of ways to do user authentication, but most of them are wrong and will end up leaving you with security vulnerabilities. JWTs are popular and can be secured, but you need to follow some best practices:
Don't store JWTs in localStorage, since any JS that runs on your page can access them, and if you get hit with a cross-site scripting attack, they can export your tokens en masse.
Store JWTs in secure, HTTPS-only cookies.
Include a global version code in your JWTs so that you can instantly invalidate all JWTs every issued.
Include a user version code in your JWTs so that a user can instantly invalidate all JWTs ever issued for them specifically. This is useful to include a "log out all devices" option for users who may have lost a device or had their account compromised.
Send a Cross-Site Request Forgery token with every request as a javascript-injected header, and make sure that token matches one you've stored for the user on login.
You'll notice a lot of these practices are "in case of a security breach", and you'd hope that if you did everything correctly, they'd be unnecessary. However, that's a fantasy and should be treated as such. No site is 100% secure and bug-free, and yours won't be either. Instead, you need to work in layers, so that if any one layer of security fails, there are still other layers and countermeasures in place.
Form validation
When users sign up, log in, and really all throughout your app, they'll be filling out and submitting forms. These forms will need to be validated for the appropriate data, preferably on both the front-end (before the data is sent to the server, to provide the best experience to the user) and the back-end (to ensure no junk data is saved to the database). If your back-end isn't in JavaScript, you'll need validation libraries for both languages that have the same semantics.
Transactional email
Transactional email is the email you send when certain events happen for your users. These can be lifecycle events, like welcome emails, "trial about to expire" emails, etc, or service-related emails like email address confirmation emails, password reset emails, notifications about your service, etc.
You'll need to find and configure a decent mailer module, and usually perform some DNS configuration at your mail service host's instruction. Some mailer modules will come with template capabilities built-in, while others will leave you to install your own.
Subscriptions/Payments
Getting paid is why most people are going to start a SaaS in the first place, so processing payments and subscriptions is mightily important. Choosing and setting up an account with a payments provider is up to individual preference, but Stripe offers probably the best API and developer experience out there, while PayPal is usually the most-requested provider of choice from users. It's likely that you'll want to offer multiple ways to pay through multiple providers, just to ensure that no potential customer is left behind.
If you offer subscriptions, you'll want to allow users to choose between a monthly billing cycle and an annual one. Annual billing is a great way for dedicated users to save money, while also offering you the benefits of higher LTV and getting you the money up-front, increasing your liquidity.
If you have multiple levels of plans, you'll need to implement the ability for users to change between those levels, usually offering a prorated fee for the month of transition.
Though it's definitely not the "happy path", you'll need to offer users the ability to cancel subscriptions. You shouldn't add extra friction to this, since some users will just be cancelling temporarily, and you want to leave a good impression on them, but it's important to try to capture the reason they're leaving, so you can improve your service.
Production deploy system
Once you've fully-developed your fancy new SaaS, you're going to need to put it up on the web for people to interact with, and for that, you're going to need a deploy system. Even if that system is largely manual, you're going to want defined, repeatable, documented steps that ensure that deploys go off without incident.
You're going to want to cover the following bases, at a minimum:
Ensure server is reachable
Ensure server is set up correctly (correct runtime libraries installed, etc.)
Update code
Run DB migrations
Ensure front-end UI code is not cached in user's browser (update ETags, etc)
There are a whole lot more things you can do to ensure a safe and clean deploy, but this list is at least a good starting place.
Production backups
Much like how we discussed security in layers above, backups of production data are another layer of defence in case something goes wrong. If you're still using manual processes to alter user data, it can be very easy for a slip of the keys to accidentally alter or delete the wrong user's data. And if you're using automated processes, it's usually a lot harder to make those simple mistakes, but more complex mistakes can make it very easy to edit or delete huge swathes of user data. Proper backups will one day save your bacon, bet on it.
What makes a proper backup, then? That's a whole topic on its own, but you should start with:
Complete: Don't just backup the database - if the user uploads files, those should be backed up as well.
Regular: Backups should happen on a schedule, ideally daily or more, for more-volatile data.
Retained: You'll want to keep your backups around for a while, though you might want to set up a schedule for longer-retained backups. (i.e. Daily backups retained for 30 days, weekly backups retained for 3 months, monthly backups retained for 1 year.)
Secure: Your backups should be kept with the same level of security as your data. If your data is encrypted at rest, your backups should be as well. Make sure to keep your encryption keys secure. If you lose those keys, you lose the backup.
Tested: A backup that hasn't been tested is not a backup. You don't want to find out that your backup process doesn't work (or stopped working) when you need to restore critical data. There should be an automated test process that runs after backups are created.
If you're lucky, your hosting platform will offer some level of database backup as a service, which will save you a lot of time and effort setting up. It likely won't cover 100% of your needs, but it will get you a lot closer than starting from scratch.
Stuff You're Gonna Want
Okay! That'll get you off the ground, but once you start seeing any success at all, you're going to start wanting something a little more... robust. Eventually, manually editing the database is going to get tedious (not to mention dangerous), and users will start asking the same questions over and over. You're going to have to slow down on development related to your core business and implement a bunch more supporting features.
Admin console
You can edit and delete users directly from the database, sure, but all it takes is one time forgetting to add a WHERE or LIMIT clause to a statement to make you long for a proper administration console. (And backups. You set up backups, right?)
An admin console is also a great place for dashboards, user statistics, summaries, metrics, etc. Your admin console can become your one-stop-shop for running your SaaS.
Documentation
Documentation can serve multiple purposes. Primarily, it's for user education, but conveniently, this is user education you don't have to do manually. Think about it like automated customer support - a user that answer their question from your documentation is a user that doesn't email you.
If your documentation is publicly available, it can also help users make purchasing decisions. By answering questions about your service openly and up-front, you can let users more-easily determine if your service will work for them, as well as reassure them about your transparency.
Public documentation also helps with SEO, since your keywords will likely naturally come up frequently on your documentation pages.
Billing history
Once you have a sufficient number or sufficiently large customers, you'll likely start getting requests around tax time for their billing history. Your payment system will keep track of payments for you, and many of them will be able to generate invoices from their web interface that you can send to customers who request it.
That might hold you for a while, but eventually, you'll want this functionality built into your system, so clients can self-serve, and your customer support team can focus on more-important issues.
Stuff That's Gonna Make Your Life A Lot Easier
Making the right decisions early on and as your service grows can have compounding benefits, but frequently, it's difficult to find time to devote to tasks that aren't seen as critical. Still, if you can make the time to invest in them, it can pay off for you and your users as well.
Pause subscriptions & credit
Especially now, when people are trying to cut costs in both their lives and businesses, the ability to pause a subscription instead of cancel it outright can mean the difference between saving a customer and losing them. Similarly, the ability to credit customers some free time or usage on your service can aid in retention, especially if something goes wrong and you want to make it up to them.
User ID obfuscation
When displaying publicly-visible auto-incrementing IDs (such as user IDs), it can be a good idea to obfuscate what that number actually is. This prevents competitors and skittish customers from identifying how much usage your service has seen so far. A great library for this is Hashids, which has many compatible implementations across many languages.
Limited number of development languages
The fewer languages your app uses, the less common code that you'll have to duplicate between the various services and projects you require. Some are going to be unavoidable, such as JavaScript if you have a web app with any serious browser interactions, Swift for iOS, and Java/Kotlin for Android. Web apps, however, offer a truly terrifying number of languages you can choose for server code: PHP, Ruby, JavaScript, Typescript, Go, Rust, Java, Python, Perl, Scala, Erlang, and even C# and C++. In a microservices environment, it can be tempting to use a variety of languages for your different services, but that means redeveloping and maintaining common libraries for every new language you want to include.
In extreme situations, you can limit yourself to just one language, even across multiple disparate platforms. JavaScript can do front-end and back-end web development, desktop development through Electron, and mobile development through Cordova. There are definite trade-offs for going this route, but for a smaller studio, this opens up a multi-platform strategy on a limited budget.
Linters
Linters like ESLint, RuboCop, and Flake8 can make a marked improvement in your code. They can catch stylistic errors long before they make it into production, and many stylistic errors are really just shortcomings of your chosen language, where hard-to-find bugs breed and propagate.
Monorepo
Monorepos are great! They're especially great if you're just starting your SaaS, as they're far simpler than trying to work with multiple repositories when managing dependencies, figuring out code re-use, and ensuring that all the correct code is committed before deploys go out.
Everyone's situation is different, of course, and it may make sense in your case to go with multiple repositories, or even one day switch to such a strategy, but when you're starting out, you want to limit the complexity of your project as much as you can, and the monorepo strategy will definitely pay off in this regard.
User impersonation
Being able to log in as your users from your Admin Console can help immensely when trying to sort out customer service issues. Instead of having several back-and-forth "what do you see now?" emails, you can just log in as them and find out. There are a lot of things to consider when writing a user impersonation feature, however: Do you require special access to impersonate users? Do you require the user's permission to impersonate them? Are actions taken while impersonated logged? Can you even take actions when impersonating, or view only? How do you indicate that you are impersonating a user (vs. logged in under your own account)?
These aren't the only considerations, but ideally it's enough to make the point that there's a lot more to user impersonation than simply changing a token ID.
Improved production deployments
Once you start getting enough customers with sufficient expectations, you'll have to make modifications to your deploy process for increased reliability and flexibility:
Updating in-place won't work forever. Eventually, switching to blue/green deploys or even something as simple as displaying a maintenance mode page while you update will be necessary to keep people from interacting with the system while performing significant changes.
If you have a complex SPA, you'll want to be able to inform users when you've made an update that requires reloading that code. Tracking version numbers both in your UI code and on the server will allow you to pop up a notification, allowing the user to save their work and then reload.
Ideally, you should be using a bug tracking service. If you also send your source maps to them when performing a deploy, they can provide even better error messages when UI errors occur.
Serving your UI JavaScript from your server is simple and easy, but users appreciate fast, and your job is to do the hard work so that users have a good time. A relatively easy way to speed up your user's experience is to upload your UI JavaScript on release to a CDN. This is a one-time change you need to make that pays dividends for your users going forwards.
You'll likely be manually checking that releases go as expected, but automated smoke tests that run on every deploy are a better way to catch issues that might otherwise slip by you when you're tired, distracted, or in a hurry.
What's the alternative?
If you don't want to start from an empty folder and write all this code yourself, you should consider using a SaaS starter kit, and it just so happens that you're reading the blog for one right now! With Nodewood, you can get started writing business logic today, saving weeks or even months of development time.
Nodewood starts you off with a full working web app, with a Vue front-end and Express back-end, built entirely from JavaScript. Form validation, testing, user authentication and management, subscription/billing are all built-in, alongside a sleek and customizable application theme with an easy-to-extend admin console.
0 notes
Link
laravel axios post example,axios post json body example,axios vue,vue axios post sample, axios post request vuejs, axios post example vue, laravel vue axios post, laravel vue post form,simple laravel vue axios,axios post multiple parameters
0 notes
Text
Building a Vue SPA with Laravel Part 3
News / February 16, 2018
Building a Vue SPA with Laravel Part 3
We will continue building our Vue SPA with Laravel by showing you how to load asynchronous data before the vue-router enters a route.
We left off in Building a Vue SPA With Laravel Part 2 finishing a UsersIndex Vue component which loads users from an API asynchronously. We skimped on building a real API backed by the database and opted for fake data in the API response from Laravel’s factory() method.
If you haven’t read Part 1 and Part 2 of building a Vue SPA with Laravel, I suggest you start with those posts first and then come back. I’ll be waiting for you!
In this tutorial we are also going to swap out our fake /users endpoint with a real one powered by a database. I prefer to use MySQL, but you can use whatever database driver you want!
Our UsersIndex.vue router component is loading the data from the API during the created() lifecycle hook. Here’s what our fetchData() method looks like at the conclusion of Part 2:
created() { this.fetchData(); }, methods: { fetchData() { this.error = this.users = null; this.loading = true; axios .get('/api/users') .then(response => { this.loading = false; this.users = response.data; }).catch(error => { this.loading = false; this.error = error.response.data.message || error.message; }); } }
I promised that I’d show you how to retrieve data from the API before navigating to a component, but before we do that we need to swap our API out for some real data.
Creating a Real Users Endpoint
We are going to create a UsersController from which we return JSON data using Laravel’s new API resources introduced in Laravel 5.5.
Before we create the controller and API resource, let’s first set up a database and seeder to provide some test data for our SPA.
The User Database Seeder
We can create a new users seeder with the make:seeder command:
php artisan make:seeder UsersTableSeeder
The UsersTableSeeder is pretty simple right now—we just create 50 users with a model factory:
<?php use Illuminate\Database\Seeder; class UsersTableSeeder extends Seeder { public function run() { factory(App\User::class, 50)->create(); } }
Next, let’s add the UsersTableSeeder to our database/seeds/DatabaseSeeder.php file:
<?php use Illuminate\Database\Seeder; class DatabaseSeeder extends Seeder { /** * Run the database seeds. * * @return void */ public function run() { $this->call([ UsersTableSeeder::class, ]); } }
We can’t apply this seeder without first creating and configuring a database.
Configuring a Database
It’s time to hook our Vue SPA Laravel application up to a real database. You can use SQLite with a GUI like TablePlus or MySQL. If you’re new to Laravel, you can go through the extensive documentation on getting started with a database.
If you have a local MySQL instance running on your machine, you can create a new database rather quickly from the command line with the following (assuming you don’t have a password for local development):
mysql -u root -e"create database vue_spa;" # or you could prompt for the password with the -p flag mysql -u root -e"create database vue_spa;" -p
Once you have the database, in the .env file configure the DB_DATABASE=vue_spa. If you get stuck, follow the documentation which should make it easy to get your database working.
Once you have the database connection configured, you can migrate your database tables and add seed data. Laravel ships with a Users table migration that we are using to seed data:
# Ensure the database seeders get auto-loaded composer dump-autoload php artisan migrate:fresh --seed
You can also use the separate artisan db:seed command if you wish! That’s it; you should have a database with 50 users that we can query and return via the API.
The Users Controller
If you recall from Part 2, the fake /users endpoint found in the routes/api.php file looks like this:
Route::get('/users', function () { return factory('App\User', 10)->make(); });
Let’s create a controller class, which also gives us the added benefit of being able to use php artisan route:cache in production, which is not possible with closures. We’ll create both the controller and a User API resource class from the command line:
php artisan make:controller Api/UsersController php artisan make:resource UserResource
The first command is adding the User controller in an Api folder at app/Http/Controllers/Api, and the second command adds UserResource to the app/Http/Resources folder.
Here’s the new routes/api.php code for our controller and Api namespace:
Route::namespace('Api')->group(function () { Route::get('/users', 'UsersController@index'); });
The controller is pretty straightforward; we are returning an Eloquent API resource with pagination:
<?php namespace App\Http\Controllers\Api; use App\User; use Illuminate\Http\Request; use App\Http\Controllers\Controller; use App\Http\Resources\UserResource; class UsersController extends Controller { public function index() { return UserResource::collection(User::paginate(10)); } }
Here’s an example of what the JSON response will look like once we wire up the UserResource with API format:
{ "data":[ { "name":"Francis Marquardt", "email":"[email protected]" }, { "name":"Dr. Florine Beatty", "email":"[email protected]" }, ... ], "links":{ "first":"http:\/\/vue-router.test\/api\/users?page=1", "last":"http:\/\/vue-router.test\/api\/users?page=5", "prev":null, "next":"http:\/\/vue-router.test\/api\/users?page=2" }, "meta":{ "current_page":1, "from":1, "last_page":5, "path":"http:\/\/vue-router.test\/api\/users", "per_page":10, "to":10, "total":50 } }
It’s fantastic that Laravel provides us with the pagination data and adds the users to a data key automatically!
Here’s the UserResource class:
<?php namespace App\Http\Resources; use Illuminate\Http\Resources\Json\Resource; class UserResource extends Resource { /** * Transform the resource into an array. * * @param \Illuminate\Http\Request $request * @return array */ public function toArray($request) { return [ 'name' => $this->name, 'email' => $this->email, ]; } }
The UserResource transforms each User model in the collection to an array and provides the UserResource::collection() method to transform a collection of users into a JSON format.
At this point, you should have a working /api/users endpoint that we can use with our SPA, but if you are following along, you will notice that our new response format breaks the component.
Fixing the UsersIndex Component
We can quickly get our UsersIndex.vue Component working again by adjusting the then() call to reference the data key where our user data now lives. It might look at little funky at first, but response.data is the response object, so the user data can be set like the following:
this.users = response.data.data;
Here’s the adjusted fetchData() method that works with our new API:
fetchData() { this.error = this.users = null; this.loading = true; axios .get('/api/users') .then(response => { this.loading = false; this.users = response.data.data; }).catch(error => { this.loading = false; this.error = error.response.data.message || error.message; }); }
Fetching Data Before Navigation
Our component is working with our new API, and it’s an excellent time to demonstrate how you might fetch users before navigation to the component occurs.
With this approach, we fetch the data and then navigate to the new route. We can accomplish this by using the beforeRouteEnter guard on the incoming component. An example from the vue-router documentation looks like this:
beforeRouteEnter (to, from, next) { getPost(to.params.id, (err, post) => { next(vm => vm.setData(err, post)) }) },
Check the documentation for the complete example, but suffice it to say that we will asynchronously get the user data, once complete, and only after completion, we trigger next() and set the data on our component (the vm variable).
Here’s what a getUsers function might look like to asynchronously get users from the API and then trigger a callback into the component:
const getUsers = (page, callback) => { const params = { page }; axios .get('/api/users', { params }) .then(response => { callback(null, response.data); }).catch(error => { callback(error, error.response.data); }); };
Note that the method doesn’t return a Promise, but instead triggers a callback on completion or failure. The callback passes to arguments, an error, and the response from the API call.
Our getUsers() method accepts a page variable which ends up in the request as a query string param. If it’s null (no page passed in the route), then the API will automatically assume page=1.
The last thing I’ll point out is the const params value. It will effectively look like this:
{ params: { page: 1 } }
And here’s how our beforeRouteEnter guard uses the getUsers function to get async data and then set it on the component while calling next():
beforeRouteEnter (to, from, next) { const params = { page: to.query.page }; getUsers(to.query.page, (err, data) => { next(vm => vm.setData(err, data)); }); },
This piece is the callback argument in the getUses() call after the data is returned from the API:
(err, data) => { next(vm => vm.setData(err, data)); }
Which is then called like this in getUsers() on a successful response from the API:
callback(null, response.data);
The beforeRouteUpdate
When the component is in a rendered state already, and the route changes, the beforeRouteUpdate gets called, and Vue reuses the component in the new route. For example, when our users navigate from /users?page=2 to /users?page=3.
The beforeRouteUpdate call is similar to beforeRouteEnter. However, the former has access to this on the component, so the style is slightly different:
// when route changes and this component is already rendered, // the logic will be slightly different. beforeRouteUpdate (to, from, next) { this.users = this.links = this.meta = null getUsers(to.query.page, (err, data) => { this.setData(err, data); next(); }); },
Since the component is in a rendered state, we need to reset a few data properties before getting the next set of users from the API. We have access to the component. Therefore, we can call this.setData() (which I have yet to show you) first, and then call next() without a callback.
Finally, here’s the setData method on the UsersIndex component:
setData(err, { data: users, links, meta }) { if (err) { this.error = err.toString(); } else { this.users = users; this.links = links; this.meta = meta; } },
The setData() method uses object destructuring to get the data, links and meta keys coming from the API response. We use the data: users to assign data to the new variable name users for clarity.
Tying the UsersIndex All Together
I’ve shown you pieces of the UsersIndex component, and we are ready to tie it all together, and sprinkle on some very basic pagination. This tutorial isn’t showing you how to build pagination, so you can find (or create) fancy pagination of your own!
Pagination is an excellent way to show you how to navigate around an SPA with vue-router programmatically.
Here’s the full component with our new hooks and methods to get async data using router hooks:
<template> <div class="users"> <div v-if="error" class="error"> <p></p> </div> <ul v-if="users"> <li v-for="{ id, name, email } in users"> <strong>Name:</strong> , <strong>Email:</strong> </li> </ul> <div class="pagination"> <button :disabled="! prevPage" @click.prevent="goToPrev">Previous</button> <button :disabled="! nextPage" @click.prevent="goToNext">Next</button> </div> </div> </template> <script> import axios from 'axios'; const getUsers = (page, callback) => { const params = { page }; axios .get('/api/users', { params }) .then(response => { callback(null, response.data); }).catch(error => { callback(error, error.response.data); }); }; export default { data() { return { users: null, meta: null, links: { first: null, last: null, next: null, prev: null, }, error: null, }; }, computed: { nextPage() { if (! this.meta || this.meta.current_page === this.meta.last_page) { return; } return this.meta.current_page + 1; }, prevPage() { if (! this.meta || this.meta.current_page === 1) { return; } return this.meta.current_page - 1; }, paginatonCount() { if (! this.meta) { return; } const { current_page, last_page } = this.meta; return `${current_page} of ${last_page}`; }, }, beforeRouteEnter (to, from, next) { getUsers(to.query.page, (err, data) => { next(vm => vm.setData(err, data)); }); }, // when route changes and this component is already rendered, // the logic will be slightly different. beforeRouteUpdate (to, from, next) { this.users = this.links = this.meta = null getUsers(to.query.page, (err, data) => { this.setData(err, data); next(); }); }, methods: { goToNext() { this.$router.push({ query: { page: this.nextPage, }, }); }, goToPrev() { this.$router.push({ name: 'users.index', query: { page: this.prevPage, } }); }, setData(err, { data: users, links, meta }) { if (err) { this.error = err.toString(); } else { this.users = users; this.links = links; this.meta = meta; } }, } } </script>
If it’s easier to digest, here’s the UsersIndex.vue as a GitHub Gist.
There are quite a few new things here, so I’ll point out some of the more important points. The goToNext() and goToPrev() methods demonstrate how you navigate with vue-router using this.$router.push:
this.$router.push({ query: { page: `${this.nextPage}`, }, });
We are pushing a new page to the query string which triggers beforeRouteUpdate. I also want to point out that I’m showing you a <button> element for the previous and next actions, primarily to demonstrate programmatically navigating with vue-router, and you would likely use <router-link /> to automatically navigate between paginated routes.
I have introduced three computed properties (nextPage, prevPage, and paginatonCount) to determine the next and previous page numbers, and a paginatonCount to show a visual count of the current page number and the total page count.
The next and previous buttons use the computed properties to determine if they should be disabled, and the “goTo” methods use these computed properties to push the page query string param to the next or previous page. The buttons are disabled when a next or previous page is null at the boundaries of the first and last pages.
There’s probably a bit of redundancy in the code, but this component illustrates using vue-router for fetching data before entering a route!
Don’t forget to make sure you build the latest version of your JavaScript by running Laravel Mix:
# NPM npm run dev # Watch to update automatically while developing npm run watch # Yarn yarn dev # Watch to update automatically while developing yarn watch
Finally, here’s what our SPA looks like after we update the complete UsersIndex.vue component:
What’s Next
We now have a working API with real data from a database, and a simple paginated component which uses Laravel’s API model resources on the backend for simple pagination links and wrapping the data in a data key.
Next, we will work on creating, editing, and deleting users. A /users resource would be locked down in a real application, but for now, we are just building CRUD functionality to learn how to work with vue-router to navigate and pull in data asynchronously.
We could also work on abstracting the axios client code out of the component, but for now, it’s simple, so we’ll leave it in the component until Part 4. Once we add additional API features, we’ll want to create a dedicated module for our HTTP client.
via Laravel News http://ift.tt/2BxHnhd
0 notes